Posts tagged ‘home brew’

December 6, 2012

Saison a Trois update – primary fermentation

It’s a bit of a techie update this, and to be honest I got bored writing the first draft, so heaven only knows how you’ll get on with this slightly (I think) improved version. I did think there might be someone, somewhere, out there who has followed the brewing of Saison a Trois and is interested in details of the fermentation, but to be honest I couldn’t find any way to make it even remotely exciting! You take your own chances…

Before embarking on this project there was a fair bit of research done into what yeast to use and how to handle its particular quirks, and with various (mostly internet) sources of information not necessarily all entirely agreeing, here’s our experience to add to the mix. We chose Whitelabs WLP565 Saison I. It is widely suggested that this yeast is one of the several strains that together form the house yeast used for Saison Dupont so it seemed a good basis for our own effort – of course it could be that it was only actually suggested once and then widely replicated around the internet, but I haven’t seen anything saying it isn’t true so I’m prepared to go with it. From this choice two themes emerged from the information available – firstly lots of reports of stuck fermentations and failure to attenuate out to the expected level; and secondly a suggestion that the yeast likes temperatures somewhat higher than the typical ale yeast range. Perhaps even as high as 32°C. So we resolved to go for a warm ferment and see what that resulted in.

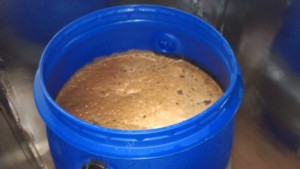
Before we go on perhaps I should explain more about how my temperature control for fermentation is set up. It all takes place in a large insulated cupboard into which a fermenter (aka a big blue barrel) is placed. In the cupboard is a heater controlled by a PID that switches the heat on whenever the temperature (according to a sensor within the cupboard) falls below a set temperature and off when it rises above the target. Actually there’s a 1 degree buffer either side of the set temperature so that the heater isn’t constantly switching on or off, but you get the idea. So the fermenting beer sits in an environment at or about the desired temperature, and raising the cupboard temperature will allow* the beer temperature to rise too.

* I’ve found this volume of actively-fermenting beer will naturally rise about 2 degrees above the surrounding air temperature in this set-up due to the heat generated by the process itself.

Cooling is a slightly different arrangement – the FV is wrapped in several loops of beer line connected to a reservoir and pump. When the temperature of the beer (this time monitored by a probe in the FV itself) exceeds the target set on a second PID the pump is switched on. This then circulates water from the reservoir, through a beer line chiller unit and round the FV. This direct cooling is quite effective and can be used to drop the beer down to just a couple of degrees after fermentation is over.

Back to the saison then. At first the temperature limit was set to 24°C and after 24 hours the fermentation was going strong. On day 2 the temperature settings were stepped up to 26°C with gravity already down to 50% attenuation by this stage. On day 3 it was time for another step up to 28°C, and the gravity had further dropped with plenty of signs of continuing activity. I was then away for work overnight but once back on day 5 things were clearly slowing down and we were close to the expected final gravity*. Despite setting temperatures up to 32°C by this stage the cold weather was limiting the heating capacity of the cupboard and the slowing fermentation was no longer producing as much heat itself so we peaked at about 28.5°C.

* actually it appeared to go some way below the expected gravity, but a later check for equipment calibration showed that slightly inaccurate readings were being obtained and adjusting for this the gravity was exactly in the right place at about 90% attenuation.

After another day at that level the temperature was dropped right down ready for transfer to a secondary vessel and on day 8 it was transferred across. This is the point at which fruit was added. 2kg of frozen blackberries were heated to pasteurize them and once cooled enough they were added to the secondary FV and the beer added on top of them.

As I write this that FV is sitting in the cupboard at about 16°C, and the remaining yeast is clearly enjoying the small amount of sugar the fruit has provided. Estimates are that no more than one point of gravity has been added by the fruit, so it won’t significantly change the ABV, but the effect on colour is much more significant, and hopefully will add some great flavour too. We’ll find out in a few days when it is racked off to the wooden cask for ageing.

November 28, 2012

Saison a Trois – the brewday report

I’d be surprised if anyone reading this wasn’t already well aware of what a fabulously sociable thing beer is (notwithstanding all those of us who quite enjoy a solo pint, as The Session a few months back proved!).  Equally it is often remarked that the brewing industry is a pretty friendly world and that seems to be backed up by the various collaborations that seem to be getting more popular these days.  So when an idea began to form (over a few beers, obviously) that myself, @MarbleTim and @ckdsaddlers could brew up a collaboration of our own, well it seemed perfect.

Of course, being a drunken idea, it was never going to be a simple affair.  By the time we parted that evening we’d already settled upon a strong dark saison, which was to be aged in a wooden cask with a helping hand from a little Brettanomyces.  A few days later and we’d added a fruity secondary fermentation on blackberries into the mix and from that point on we never looked back.

It wasn’t without its difficulties though.  For starters we didn’t actually have a wooden cask, and it quickly became apparent that the only way we were going to get one small enough to be any use was to buy new – a second-hand wine or whisky barrel would have added flavour and complexity but at 55 gallons the size just isn’t practical.  Eventually a nice new chestnut (less intensely woody than oak apparently) 30l cask was sourced and so we were well on track.  But to fill a 30l cask you need at least 30l of beer.  Actually you need more, as even over the course of a few months aging there’ll be evaporation – the whisky distiller’s angels’ share – and we really need to top that back up.  And it felt wrong not to have something to bottle when the main batch went into the cask, so we could get an earlier idea of how it would turn out while we were waiting for the aged version to be ready. 

So the target was 50l.  Not a problem in theory, given that I’d already got the makings of a 100l brewery in progress.  But that is the key point – in progress.  Not finished.  Still, nothing like a bit of incentive to get on with a job.  A 60l fermenter complete with a cooling coil, was quickly ready but the real challenge was the mash tun.  There was always the option of mashing twice in my tiny (by comparison) original mash tun, but this wasn’t an ideal solution and even with two mashes it was going to be a tight fit to get enough wort to end up with 50l strong enough to ferment out to around 7% ABV.  Having decided that the only solution was to crack on and get the new mash tun finished, and realising that I needed to get off the fence and either make the last bits I needed or get them bought, I finally put my hand in my pocket and, despite some hiccups along the way, am glad I did.  The insulation may have still been a work in progress on the morning of the brewday, but it did the job and a last minute reconfiguration of the plumbing work didn’t hurt either.  There may have been more satisfaction about making every last bit of it myself, but if I’m really honest, in 12 months time I’d probably still be waiting to get around to it and instead I can now get on with brewing instead.  Or rather, focus on finishing off all the other jobs that are still outstanding…

So, finally, as a result of that slightly drunken conversation back in July, on a cold and frosty morning last weekend we finally got to turn our plans into reality.  By half past 9 the liquor tank was warming up nicely as Chris and Tim turned up raring to go, and so we quickly got underway.

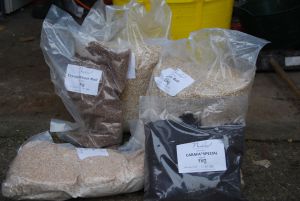
Our planning over the previous months had seen the theme of “three” firmly embedding itself, not least in the chosen name of our brew, “Saison a Trois” (which should explain the regular appearance of that hashtag on Twitter recently!) and so we started off with preparing our grist made up of three different types of grain – barley, wheat and spelt, and before long were mashing in the largest grain bill that the Otherton brewery has faced to date.  The mash was deliberately on the cool side to get a higher than normal level of fermentables – we wanted this to finish on the dry side, while the spelt will hopefully give an increased perception of body to avoid it being too thin. 

The grain bill...

The grain bill…

Mashing in

The start of the sparge saw the christening of the new sparge arm (see my previous post on that subject) which I’m pleased to report was a definite success, and before long we were collecting a lovely dark wort into the copper ready for the boil.

Sparging

Sparging – or as Chris put it: “swirly thing alert”

By this stage it was becoming apparent that, unlike some of my recent solo efforts, this was going to be a well organised brewday and we were able to relax with some tastings of the last two Otherton efforts – including a porter straight from the fermenter which needed to be emptied before the saison could go in – as well as some bottled treats that Chris and Tim brought along for the occasion.

First runnings

First runnings into the copper

Hop addition

Transfer

The boil came and went without incident, three hop additions of Bramling Cross to maintain the theme, and before long we were chilling and transferring, and then it was time to pitch the first of the yeasts that will play a part in making this beer.  Allegedly the strain of yeast used in Saison DuPont, or at least the main one of the blend, we had settled for WLP565, and a healthy starter was pitched following transfer.  Two days later and this was already fermented down to half the starting gravity, and another day on it has passed 75% attenuation while still looking lively.  With this yeast strain supposedly favouring warmer temperatures the normal rule book was thrown out and gradually the temperature is being allowed to rise up by a couple of degrees a day, towards a maximum of 32C targeted by the end of the week – fingers crossed this really does work the way it is supposed to, because it feels very unnatural letting the yeast get so warm!

Starter

The yeast starter (split between demijohn and flask) alongside a better known example of its heritage.

Fermentation

So that’s it for now, until the target gravity (tests have indicated this should go down to 1006 in primary fermentation) is reached and it can be racked off onto the blackberries for a couple more weeks where it should pick up some fruity flavours and an interesting tinge of colour.  Then it is into the cask for a few months for the majority, where the second yeast addition comes courtesy of a couple of bottles of Orval – a handy way to get a little Brett into the cask and an enjoyable task to empty the majority of the bottles out first.  Tough work, but someone has to do it.

The cask!

Bend from the knees…Fortunately this lifting technique was only demonstrated while the cask was empty!

That cask is currently sitting (almost) ready to go, filled with water to allow the wood to swell and seal.  After an initial bout of incontinence mostly caused by an ill-fitting bung, all is holding well and so we are, quite literally, holding water. 

The final stage, once the beer has aged sufficiently (and I guess there’ll need to be some regular sampling, just to make sure…) will be the final bottling – anything left over when the cask is filled up will go straight to this step too – with a suitable third yeast addition to get them nicely carbonated.  We’re thinking a champagne yeast would suit the style and strength well and some sturdy bottles with cork and cage will provide a nice finishing touch.  Watch out for these next summer, just in time for saison season, when hopefully I can provide an update on what it tastes like and whether all the effort was worthwhile!

Posted in Uncategorized | 7 Comments »

Tags: , , , , , , , , , , , , ,
April 26, 2012

Brewing up a disaster – ten lessons learnt on a bad brewday…

Sometimes you just have one of those days. I have to admit to some of it being self-inflicted, as I am a victim of my own disorganisation, but on the other hand I’m disorganised because I haven’t got as much time as I’d like to sort everything out. However, all’s well that ends well, right?

Last Thursday was to be my first brewday using my newly built hot liquor tank. This had already been converted from an old plastic drum, water tested (cold and hot) and the sight tube calibrated, so all good there. It even contained enough water for the brew so I didn’t need to fill it up. Wrong.

#Lesson 1 – if you leave 100 litres water in the tank ready for brewing, make sure the tank is in the right place first…

Ok. Drain, move, refill. Start heating. Get the pump set up ready for filling the mash tun. Relax? Wrong again.

#Lesson 2 – have a spare pump, or at least make sure the one you have is working before you need it.

To be fair, I was setting it up to recirculate water in the HLT in the first instance, so fortunately by the time it suddenly and inexplicably burst back into life the water was only just reaching the strike temperature so no time was lost, however this was only because of…

#Lesson 3 – check how long a large volume of water will take to heat up, and get it warming up early enough (although Lesson 1 becomes even more important now).

In the meantime I was also preparing the ingredients for the mash, and got a harsh reminder of why you have to plan carefully.

#Lesson 4 – keep a decent inventory of your raw materials, weigh out the night before if possible, and only try and brew something you can actually make with what you have!

By this stage I was getting quite resourceful, so it wasn’t too difficult to reformulate the recipe slightly around a few different malts which, I’m sure, will only benefit the end product by introducing even more delicious malt complexity. No really, I’m sure it will. I’m glad I was getting resourceful though, because lesson 4 came back again later when I tried to find the hops I was convinced I had in the freezer.

The mash passed by with little incident, until it came to sparging, when I decided to try (for the first time) fly sparging, ultimately with some success, but not without extensive swearing and general frustration.

#Lesson 5 – test the new setup before the day you use it, and then you’d establish you need a better way to control flow rate through the pump when there is still time to fix the problem.

So there’s a little bit of effort still to be made in order to establish a more workable arrangement for future sparging, although I did at least satisfy myself that this is the way I want my setup to work in the future. Naturally, given the day I was having, I ended up with about the right volume in the boiler but at way too low a gravity. As this is the fourth time this has happened, and all from this one sack of malt, I have concluded that I have a very poor batch and shall have to get some more in to replace it.  In the end I had to extend the boil for a while to try and get closer to the target, but it was still quite a way short.

On several occasions throughout the mash and boil the disorganised chaos that forms my brewing space just kept on taunting me.

#Lesson 6 – have somewhere to keep everything, and then keep it there – don’t leave thermometers etc lying around because you’ll spend ages searching for them each time. This may require actually finishing off those cupboards and worktops so that they can actually be used for putting things in!

In parallel to the boil I had decided to heat up some more water to clean through the pump and chiller, and once again I set the pump up to recirculate the water round. 50l of hot water should do the trick, I can leave that and come back in a bit, can’t I?

#Lesson 7 – if you’re going to leave a hose unattended, make sure it can’t fall out of where you’ve left it. Coming back to find just 30l water in the tank and the hose trailing on the floor doesn’t improve your day.

After all that, while it wasn’t exactly plain sailing, the remaining problems were mostly minor. The yeast kicked in eventually, but lack of a temperature-controlled space for one of the two FVs is proving an ongoing problem.

#Lesson 8 – get round to building that fermentation cupboard that’s been planned for months!!

All in all though, it was still an enjoyable brewday, despite everything above, and despite all the rain which I haven’t even mentioned! It took longer than expected at least in part due to the problems experienced, and also down to the process of getting used to new equipment, larger brew lengths etc. However, I have two FVs containing a liquid that is gradually turning into something that resembles beer, so fingers crossed the outcome will be well worth it. Not long to wait now – the yeast I’ve used has been a slow performer for me (this is the third attempt with similar results each time) but with a good rousing tonight I’d hope that by the end of the weekend it’ll be ready to go into cask and the first sample will have been tasted.  All that then leads me to are the final lessons…

#Lesson 9 – find the time to finish building this bigger brewery (larger mash tun next) and get on with brewing some hopefully fantastic beers!

#Lesson 10 – whatever happens, enjoy it! Brewing beer is great! (honest)

Here’s to the next, almost certainly much more successful brewday.

Posted in Uncategorized | 3 Comments »

Tags: , , , , ,